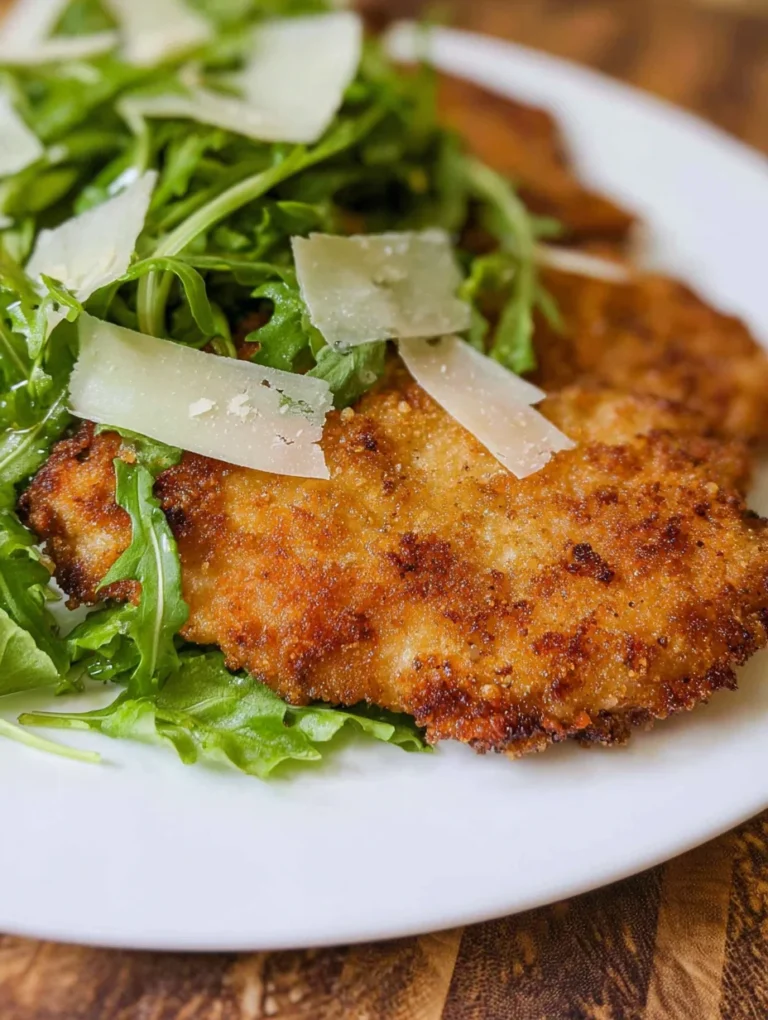
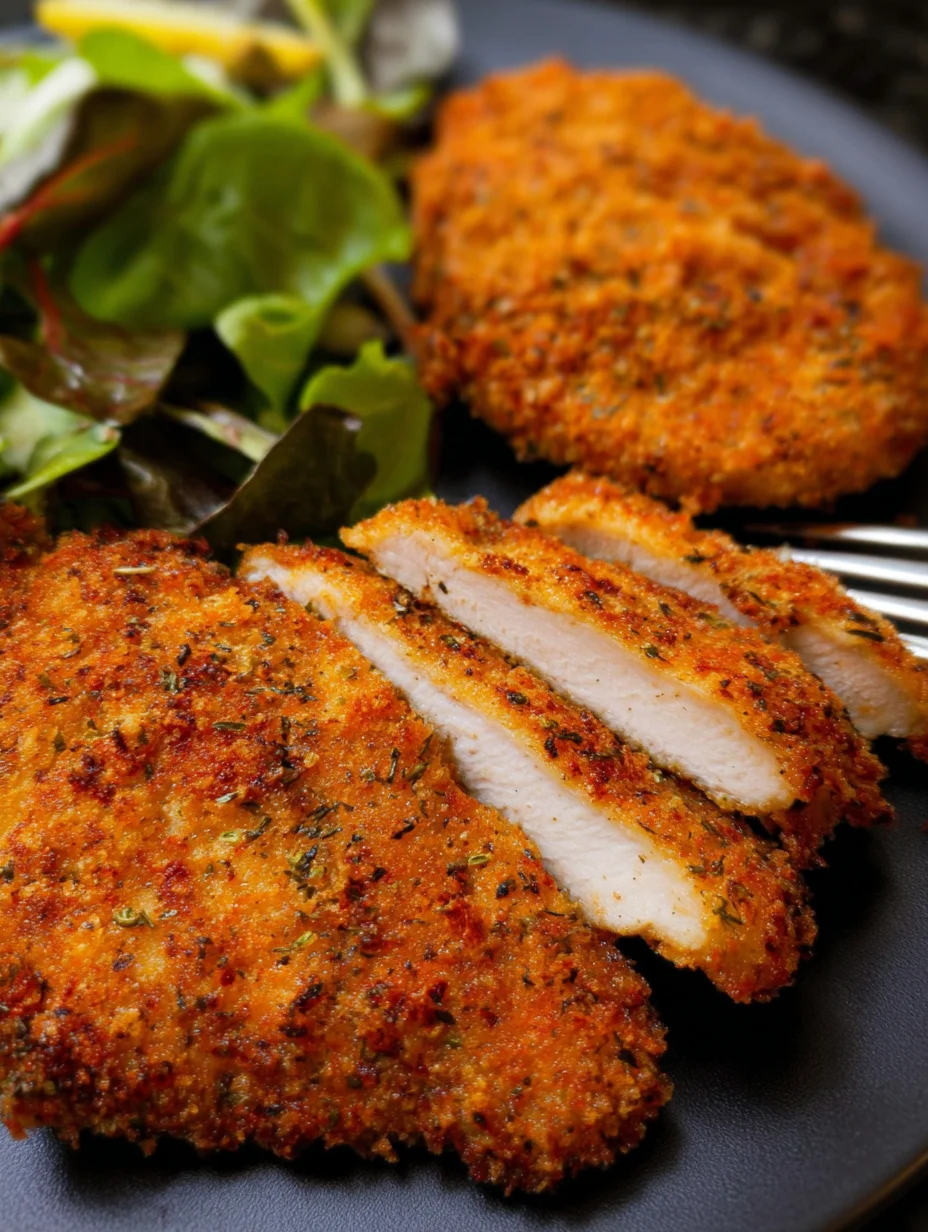
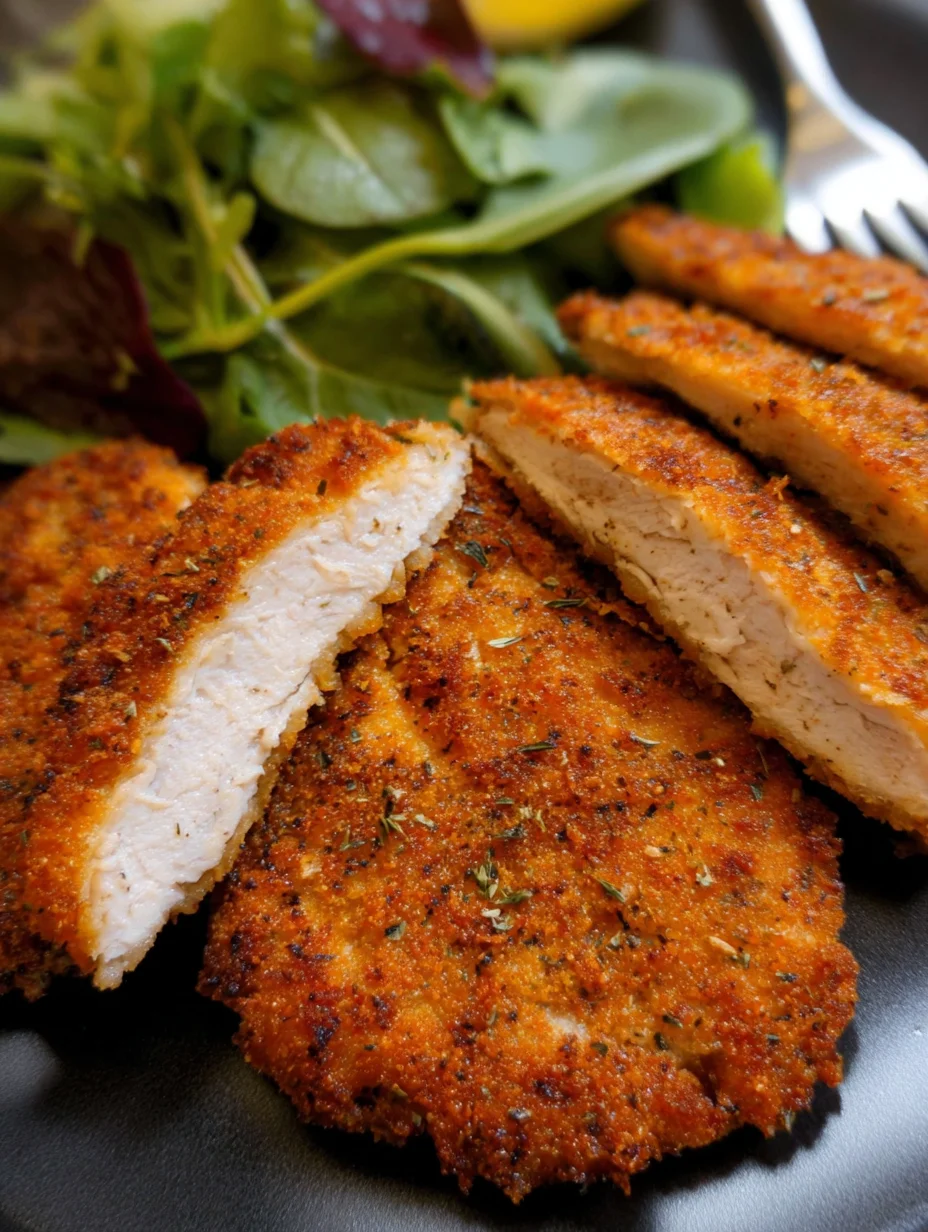
Crispy Chicken Breast in Air fryer
There’s nothing quite like biting into a perfectly Crispy Chicken Breast that shatters with every crunch, revealing juicy, flavorful meat inside. I’ve been making this Crispy Chicken Breast for years, and it’s become a staple in my weekly meal rotation because it’s so versatile and crowd-pleasing. Whether you’re a busy parent whipping up dinner or just craving something comforting, this recipe delivers that satisfying contrast of textures without much fuss. In my experience, the secret lies in the simple breading technique that locks in moisture while creating that irresistible golden exterior.
What I love most about this Crispy Chicken Breast is how it transforms basic chicken into something extraordinary—think restaurant-quality results at home. I’ve tweaked it over time based on what works best in my kitchen, and now I’m excited to share it with you. Let’s dive into making your own Crispy Chicken Breast that’s sure to become a favorite. Pair it with your go-to sides, and you’ll have a meal everyone raves about.
Key Takeaways:
- Discover the ultimate Crispy Chicken Breast with a foolproof breading method for maximum crunch and juiciness.
- Ready in under 30 minutes, perfect for weeknight dinners without sacrificing flavor.
- Bursting with savory seasonings that elevate the classic Crispy Chicken Breast taste.
- Pat the chicken dry and use room-temperature eggs for the crispiest results every time.
- Store leftovers in the fridge for up to 3 days; reheat in the oven to maintain crispiness.
Why You’ll Adore This Crispy Chicken Breast
Effortless Preparation: This Crispy Chicken Breast comes together quickly with pantry staples you likely already have. No complicated techniques here—just a straightforward breading process that anyone can master. In my kitchen, it’s a go-to when I need dinner on the table fast, yet it feels indulgent every time.
Grab This Chef Knife Now - Almost Gone!

- Stays Razor-Sharp: Ice-hardened blade keeps its edge longer than ordinary knives
- Superior Grip Control: Unique finger hole design gives you perfect balance and safety
- Built to Last a Lifetime: Premium stainless steel blade with elegant beech wood handle
- ✓ Finally, a knife that stays sharp and feels comfortable in my hand
- ✓ Professional quality without the premium price tag
- ✓ Makes meal prep faster and more enjoyable
⏰ Only a few items left in stock - order soon
Family-Friendly Appeal: Kids and adults alike can’t get enough of the crunchy exterior and tender inside of this dish. We always fight over the last piece! It’s versatile too, serving as a base for salads, sandwiches, or standalone with veggies.
Healthier Twist Possible: While traditional, you can bake your Crispy Chicken Breast for a lighter version without losing that beloved texture. It’s a smart way to enjoy comfort food guilt-free, and I’ve found it reheats beautifully.
Customization Joy: Spice it up or keep it simple— the Crispy Chicken Breast adapts to your mood. Experiment with herbs or dips to make it your own, turning a simple recipe into personalized favorites that keep things exciting.
Essential Ingredients for Crispy Chicken Breast
Chicken Breasts: Opt for boneless, skinless chicken breasts about 6-8 ounces each; they’re the star of your Crispy Chicken Breast. Pounding them to even thickness ensures uniform cooking and juiciness. In my experience, fresh, high-quality chicken makes all the difference in achieving that tender interior.
Grab This Kitchen Scale Now — Best Precision Pick!

- Razor-Accurate Every Time: Dual-increment precision down to 0.1g — perfect for baking, meal prep, and portion control with g, oz, ml, and fl'oz modes.
- Smart Removable Bowl Design: Detachable bowl doubles as a protective case for compact storage. Tare function lets you weigh ingredients in any container with zero fuss.
- Built for Everyday Convenience: Auto-zero, tare function, low battery alert, overload indicator, and 2-minute auto-off to extend battery life — all in a sleek stainless steel build.
- ✓ "Perfect for baking — precise, lightweight, and stores easily without wasting counter space"
- ✓ "A game changer! Weighing ingredients is now way more accurate than measuring cups"
- ✓ "Love the 0.1g precision and backlight — best food scale I've owned. Highly recommend!"
⏰ Only a few items left in stock - order soon
Breadcrumbs: Panko breadcrumbs are ideal for the lightest, crispiest coating in this Crispy Chicken Breast. They absorb less oil and create those delightful flakes of crunch. Mix in some Parmesan for extra flavor if you like—it’s a game-changer.
Eggs and Flour: Eggs act as the binding agent, while all-purpose flour provides a base for the breading to adhere perfectly to your Crispy Chicken Breast. Use two eggs for a standard batch to coat everything evenly. This classic trio guarantees a flawless crust every time.
How to Make Crispy Chicken Breast
Prepare the Chicken
Start by placing your chicken breasts between two sheets of plastic wrap and gently pound them to about 1/2-inch thickness using a meat mallet or rolling pin. This step is crucial for even cooking in your Crispy Chicken Breast, preventing dry edges. Season both sides generously with salt, pepper, and a pinch of garlic powder for that base flavor. In my kitchen, I let it sit for 10 minutes to absorb the seasonings—trust me, it enhances the taste immensely. Pat dry thoroughly before proceeding to ensure the breading sticks well.
Bread the Chicken
Set up three shallow bowls: one with flour seasoned with salt and pepper, one with beaten eggs whisked with a splash of water or milk, and the last with breadcrumbs mixed with Italian seasoning or paprika. Dip each chicken piece first in flour, shaking off excess, then into the egg, and finally coat generously with breadcrumbs, pressing to adhere. For the best Crispy Chicken Breast, double-dip the thinner ends if needed to avoid bare spots. Let the breaded chicken rest on a wire rack for 5 minutes; this helps the coating set and prevents sogginess later. The aroma at this stage is already mouthwatering!
Cook to Perfection
Heat vegetable oil in a large skillet over medium-high heat until shimmering, about 1/2-inch deep. Fry the breaded chicken in batches for 4-5 minutes per side until golden brown and the internal temperature reaches 165°F. Your Crispy Chicken Breast should sizzle upon entering the oil, creating that perfect crust. Drain on paper towels to keep it crisp. If baking instead, place on a wire rack over a baking sheet at 425°F for 20-25 minutes, flipping halfway—still yields amazing results with less oil.
Ingredients
- 4 boneless, skinless chicken breasts (about 1.5 lbs)
- 1 cup all-purpose flour
- 2 large eggs, beaten
- 1 1/2 cups panko breadcrumbs
- 1 tsp garlic powder
- 1 tsp paprika
- Salt and black pepper, to taste
- Vegetable oil, for frying
Crispy Chicken Breast Instructions
- Pound chicken breasts to 1/2-inch thickness and season with salt, pepper, and garlic powder. Let rest for 10 minutes.
- Dredge in flour, dip in beaten eggs, then coat with seasoned breadcrumbs. Press to adhere and rest on a wire rack for 5 minutes.
- Heat oil in a skillet over medium-high. Fry chicken 4-5 minutes per side until golden and 165°F internal. Drain and serve hot.
Pro Tips for the Best Crispy Chicken Breast
Use Panko for Extra Crunch: Regular breadcrumbs work, but panko gives your Crispy Chicken Breast that superior lightness and texture.
Don’t Overcrowd the Pan: Fry in batches to maintain oil temperature; otherwise, your Crispy Chicken Breast steams instead of crisps.
Check Temperature: Always use a meat thermometer to ensure your Crispy Chicken Breast is safely cooked without drying out.
You Must Know
- This Crispy Chicken Breast is versatile for salads, wraps, or as a main with sides.
- Avoid low-heat cooking to preserve the signature crispiness.
- Freshly grated Parmesan in the breadcrumbs amps up the flavor profile.
- Oil should be hot enough to sizzle immediately for the best results.
How to Store Crispy Chicken Breast
To keep your Crispy Chicken Breast fresh, store leftovers in an airtight container in the fridge for up to 3 days. For longer storage, freeze slices individually wrapped for up to 2 months. Reheat in a 350°F oven on a wire rack for 10-15 minutes to revive the crispiness—microwaving makes it soggy, so skip that. I’ve found this method keeps it tasting almost as good as fresh.
Customizing Your Crispy Chicken Breast
Swap panko for crushed cornflakes if you’re out, or go gluten-free with almond flour and GF breadcrumbs for your Crispy Chicken Breast. Add herbs like thyme to the breading for a Mediterranean twist, or spice it with cayenne for heat. For a baked version, brush with olive oil before oven time—still deliciously crispy. Check out our air fryer chicken breast recipe for another easy variation.
What to Serve with Crispy Chicken Breast
Pair your Crispy Chicken Breast with a fresh green salad tossed in vinaigrette for a light contrast, or creamy mashed potatoes to soak up any pan juices. Roasted vegetables like broccoli or asparagus add color and nutrition without overpowering the main dish. For carbs, try garlic bread or a simple rice pilaf. Don’t forget a crisp white wine or iced tea to round out the meal—it’s all about balance.

Crispy Chicken Breast in Air fryer
Boneless chicken breast fillets coated in a seasoned bread crumb mixture and air fried until crispy outside and moist on the inside. With just a teaspoon of oil, this crispy chicken breast tastes as good as fried chicken.
Timing
Recipe Details
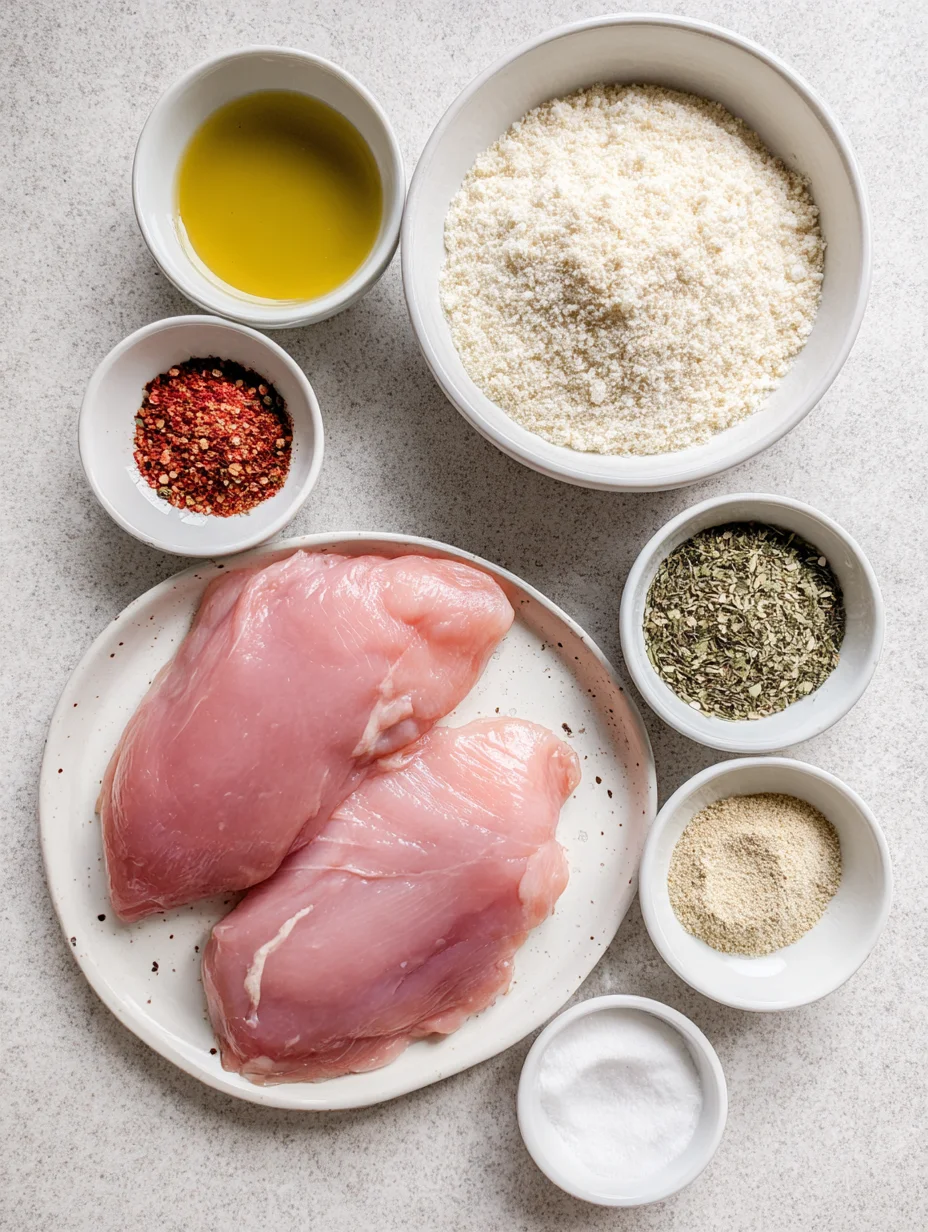
Ingredients
- 01 2 large Chicken Breast
- 02 1 tablespoon Oil
- 03 1/4 teaspoon Salt
- 04 1/2 teaspoon Pepper
- 05 1/2 cup Fine Breadcrumb
- 06 1 tablespoon Flour
- 07 1 teaspoon Garlic Powder
- 08 1/2 teaspoon Onion Powder
- 09 1/2 teaspoon Dried Thyme
- 10 1 teaspoon Dried Basil
- 11 1/2 teaspoon Salt
- 12 1/2 teaspoon Chili powder ((or paprika))
Instructions
Cut chicken breast into cutlets or fillets. Using a meat mallet or a rolling pin pound any thick part of the fillets to get even thickness.
Mix oil, salt, pepper. Coat chicken well with the mixture.
In another mixing bowl add breadcrumb, flour, and the rest of the spices.
Place one chicken cutlet on the breadcrumb mixture one at a time. Press gently so that the mixture sticks to the chicken. Flip and repeat the same.
Place coated chicken breast in the Airfryer inner tray, spaced a little apart.
Set temperature @ 200 °C / 390 °F. Cook for 8-9 minutes. Flip and cook for another 4 minutes.
Let it rest for 5 minutes, before slicing it.
FILED UNDER:
NUTRITION FACTS (PER SERVING)
Nutrition information is calculated using an ingredient database and should be considered an estimate. In cases where multiple ingredient alternatives are given, the first listed is calculated for nutrition. Garnishes and optional ingredients are not included.
Frequently Asked Questions About Crispy Chicken Breast
Can I make Crispy Chicken Breast ahead of time?
Yes, you can bread the chicken up to 4 hours in advance and refrigerate it covered. Fry just before serving for the best texture. If pre-cooking, reheat as suggested to maintain crispiness.
How long does Crispy Chicken Breast last in the fridge?
Cooked Crispy Chicken Breast stays good for 3-4 days in the fridge when stored properly. Beyond that, freeze it to avoid waste. Always check for freshness before eating.
Can I bake the Crispy Chicken Breast instead of frying?
Absolutely, baking at 425°F on a wire rack yields a healthier Crispy Chicken Breast with great crunch. It takes about 20-25 minutes, flipping halfway. Brush with oil for extra golden color.
What’s the best oil for frying Crispy Chicken Breast?
Vegetable or canola oil works best due to high smoke points, ensuring your Crispy Chicken Breast fries evenly without burning. Use enough to submerge halfway for consistent results. Avoid olive oil as it can smoke.
Is Crispy Chicken Breast gluten-free?
Not as written, but easy to adapt with GF flour and breadcrumbs. It turns out just as delicious. Look for certified GF options to keep everyone safe.
How do I know when my Crispy Chicken Breast is done?
Use a thermometer for 165°F internal temp—juiciest way to ensure your Crispy Chicken Breast is perfect. The coating should be deeply golden too. Cut into one if unsure, but juices should run clear.
Can I use chicken tenders for Crispy Chicken Breast?
Yes, tenders cook faster, about 3 minutes per side. They’re great for kids. Adjust breading portions accordingly for smaller pieces.
What if my Crispy Chicken Breast isn’t crispy enough?
Ensure oil is hot and don’t overcrowd the pan. Resting breaded pieces helps too. For more tips, see our fried chicken breast recipe.
Final Thoughts
This Crispy Chicken Breast recipe has saved many a dinner in my home, blending simplicity with wow-factor results that keep everyone happy. From the first crunch to the last bite, it’s pure comfort elevated. Give it a try tonight—you won’t regret it, and I’d love to hear how your Crispy Chicken Breast turns out. For more chicken inspiration, check out our creamy garlic chicken next.