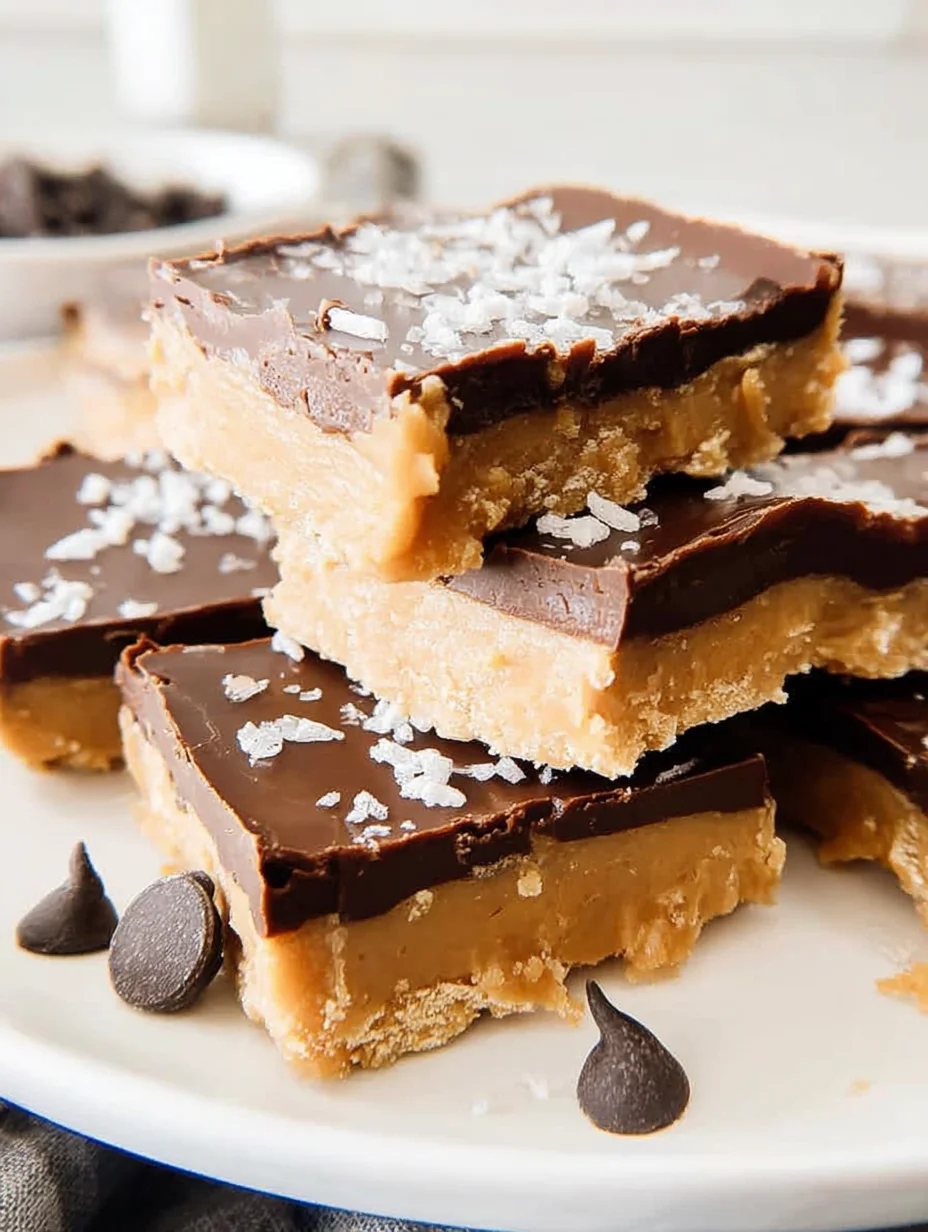
Buckeye Bars

Have you ever craved that perfect blend of creamy peanut butter and rich chocolate, but didn’t want to spend hours in the kitchen? That’s where Buckeye Bars come in – these no-bake delights are my go-to for satisfying sweet tooth cravings without the fuss. Inspired by the classic Ohio treat, Buckeye Bars capture that irresistible peanut butter cup vibe in an easy-to-share bar form. I’ve made them countless times for parties, and they always disappear fast.
What’s great about homemade Buckeye Bars is how simple they are to whip up with pantry staples. No oven required, just a bit of mixing and chilling. In my experience, they’re a hit with kids and adults alike, especially when paired with something like our oatmeal chocolate chip cookies for a cookie bar spread. If you’re looking for more chocolatey inspiration, check out our Mexican hot chocolate cookies too. Let’s dive into this recipe – I can’t wait for you to try making Buckeye Bars and see why they’re so addictive!
Key Takeaways:
- Buckeye Bars are a no-bake dessert that’s perfect for quick treats with peanut butter and chocolate flavors.
- Prep and chill time is under 30 minutes active, making them ideal for busy days.
- The creamy peanut butter base contrasts beautifully with the smooth chocolate topping for ultimate indulgence.
- Chill thoroughly for clean cuts and best texture in your Buckeye Bars.
- Store in the fridge for up to a week; freeze for longer enjoyment.
Why You’ll Adore This Buckeye Bars
No-Bake Simplicity: Who doesn’t love a dessert that skips the oven? These Buckeye Bars come together in minutes, letting you focus on the fun part – devouring them. I’ve found they’re perfect for hot summer days when turning on the heat isn’t an option.
Grab This Chef Knife Now - Almost Gone!

- Stays Razor-Sharp: Ice-hardened blade keeps its edge longer than ordinary knives
- Superior Grip Control: Unique finger hole design gives you perfect balance and safety
- Built to Last a Lifetime: Premium stainless steel blade with elegant beech wood handle
- ✓ Finally, a knife that stays sharp and feels comfortable in my hand
- ✓ Professional quality without the premium price tag
- ✓ Makes meal prep faster and more enjoyable
⏰ Only a few items left in stock - order soon
Irresistible Flavor Combo: Peanut butter and chocolate are a match made in heaven, and in these bars, they shine. The creamy filling melts in your mouth, balanced by the crisp chocolate layer. Let’s be honest, it’s like eating a giant Reese’s, but better because it’s homemade!
Make-Ahead Magic: Buckeye Bars are even better when prepared in advance. The flavors deepen as they chill, making them a stress-free option for gatherings. You might be thinking, “Can they really last?” – trust me, they do, and taste amazing.
Crowd-Pleasing Versatility: Whether it’s a family dessert or potluck star, these bars fit right in. Customize with nuts or sea salt for a twist that wows everyone. In my experience, they’re always the first to go!
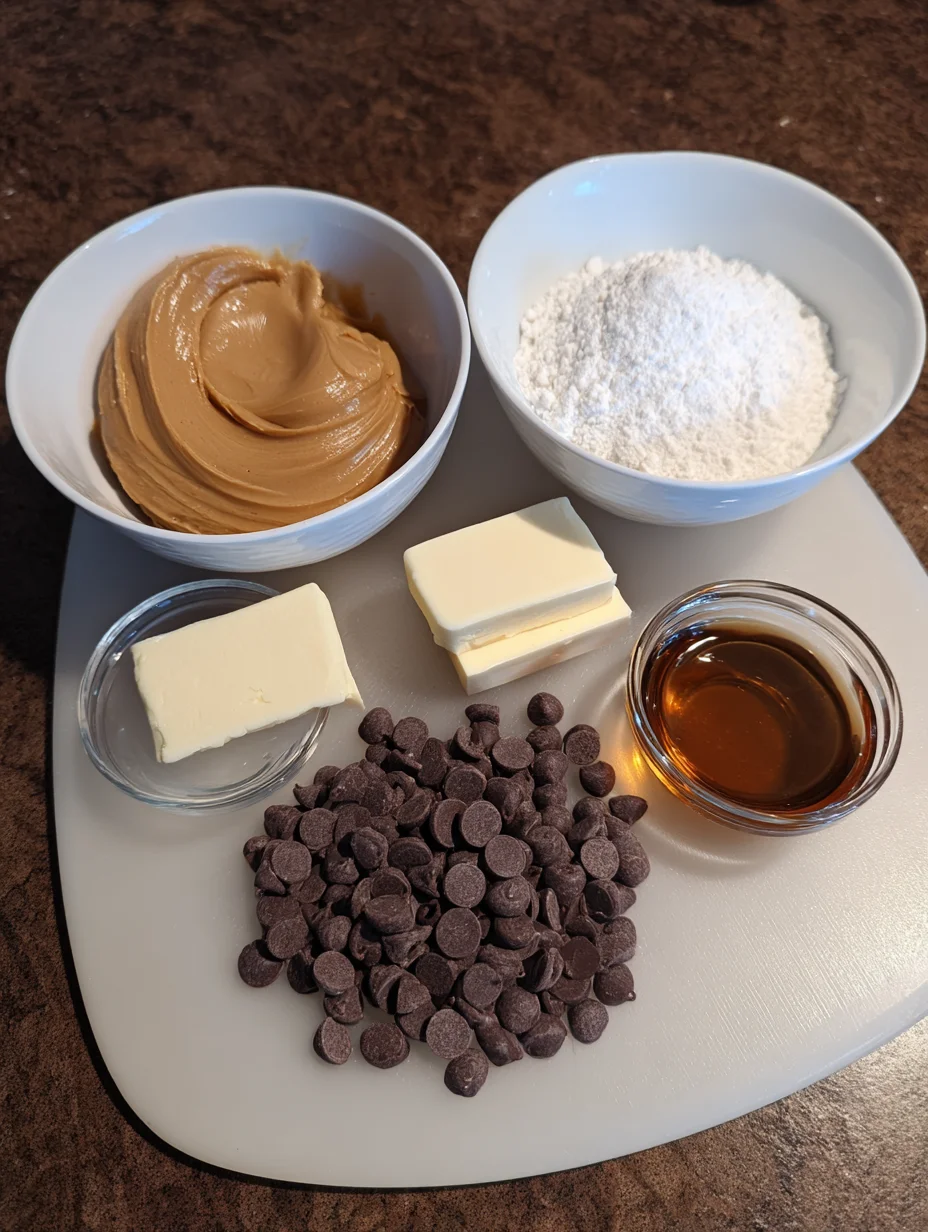
Essential Ingredients for Buckeye Bars
Peanut Butter: Creamy peanut butter is the heart of these Buckeye Bars, providing that smooth, nutty base everyone loves. It binds everything together while delivering bold flavor that pairs perfectly with chocolate. Opt for natural or regular – just ensure it’s not too oily to keep the texture firm. In my kitchen, I always use Jif for that classic taste.
Grab This Kitchen Scale Now — Best Precision Pick!

- Razor-Accurate Every Time: Dual-increment precision down to 0.1g — perfect for baking, meal prep, and portion control with g, oz, ml, and fl'oz modes.
- Smart Removable Bowl Design: Detachable bowl doubles as a protective case for compact storage. Tare function lets you weigh ingredients in any container with zero fuss.
- Built for Everyday Convenience: Auto-zero, tare function, low battery alert, overload indicator, and 2-minute auto-off to extend battery life — all in a sleek stainless steel build.
- ✓ "Perfect for baking — precise, lightweight, and stores easily without wasting counter space"
- ✓ "A game changer! Weighing ingredients is now way more accurate than measuring cups"
- ✓ "Love the 0.1g precision and backlight — best food scale I've owned. Highly recommend!"
⏰ Only a few items left in stock - order soon
Chocolate Chips: Semi-sweet chocolate chips create the glossy top layer that seals in all the goodness. They melt smoothly for easy spreading, giving Buckeye Bars their signature shine. Melt them with a touch of butter for extra creaminess; it’s a small step that makes a big difference in the final result.
Powdered Sugar: This sweetens and thickens the peanut butter mixture, turning it into a fudgy base for your Buckeye Bars. It dissolves easily without graininess, ensuring a velvety texture. I’ve experimented, and it really helps achieve that non-sticky consistency perfect for slicing.
How to Make Buckeye Bars
Prepare the Peanut Butter Base
Start by mixing the peanut butter, softened butter, powdered sugar, and graham cracker crumbs in a large bowl until it forms a thick, dough-like consistency. This is the foundation of your Buckeye Bars, so press it firmly into a lined 8×8-inch pan for even layers. I like to use a spatula to smooth it out – it only takes a couple of minutes. In my experience, chilling the base briefly before adding chocolate helps prevent cracking.
Once pressed in, give the pan a gentle tap on the counter to remove air pockets. You’ll notice the mixture’s richness; it’s dense and peanutty, promising great flavor. If it’s too sticky to handle, dust your hands with a bit more powdered sugar. This step sets the stage for the magic to come.
Melt and Spread the Chocolate Topping
Now, melt the chocolate chips with butter in the microwave in short bursts, stirring until silky smooth. Pour this over the chilled peanut butter layer and spread evenly with an offset spatula. The warmth of the chocolate will start to soften the base slightly, blending flavors beautifully. Work quickly here to keep the chocolate from setting too soon.
Here’s the thing: the chocolate should cover every inch for that classic Buckeye Bars look. Tilt the pan if needed to fill corners. As it cools, the topping firms up, creating a snappy contrast to the creamy filling. Patience pays off – let it set fully for the best bite.
Chill and Cut into Bars
Pop the pan into the fridge for at least 2 hours to allow everything to firm up. Once set, lift out using the parchment and cut into squares with a sharp knife. Wiping the blade between cuts ensures clean edges on your Buckeye Bars. They’re now ready to serve or store.
This chilling step is crucial; rushing it leads to messy slices. I always cover the pan loosely to avoid condensation. For extra flair, drizzle with more melted chocolate before chilling – it adds a professional touch. Enjoy the satisfaction of your homemade creation!
Ingredients
- 1 1/2 cups creamy peanut butter
- 1/2 cup unsalted butter, softened
- 2 cups powdered sugar
- 1 1/2 cups graham cracker crumbs
- 2 cups semi-sweet chocolate chips
- 1/4 cup unsalted butter (for chocolate layer)
Buckeye Bars Instructions
- In a large bowl, combine peanut butter, softened butter, powdered sugar, and graham cracker crumbs. Mix until well combined and press into a lined 8×8-inch pan.
- Chill the base in the fridge for 15-20 minutes to firm up.
- Melt chocolate chips with 1/4 cup butter in the microwave, stirring every 30 seconds until smooth. Pour over the base and spread evenly.
- Refrigerate for at least 2 hours or until set. Cut into bars and serve.
Pro Tips for the Best Buckeye Bars
Room Temperature Butter: Always use softened butter for easy mixing; it ensures a smooth base without lumps.
Line Your Pan: Parchment paper makes removal a breeze, preventing your Buckeye Bars from sticking.
Sharp Knife for Cutting: Warm the blade in hot water for clean, professional-looking slices every time.
You Must Know
- Buckeye Bars are naturally gluten-free if using gluten-free graham crackers.
- They contain peanuts, so check for allergies before serving.
- The recipe yields about 16 bars, perfect for sharing.
- No eggs or baking powder – truly no-bake simplicity.
How to Store Buckeye Bars
To keep your Buckeye Bars fresh, store them in an airtight container in the fridge for up to one week. For longer storage, freeze them wrapped in plastic and foil for up to three months – they thaw quickly at room temp. Avoid leaving them out; the chocolate softens in warmth. I’ve found they taste just as good after freezing!
Customizing Your Buckeye Bars
Swap creamy peanut butter for crunchy if you like texture, or add chopped peanuts for extra crunch in your Buckeye Bars. For a healthier twist, use dark chocolate and reduce sugar slightly. Vegan options? Try almond butter and dairy-free chocolate. Check out our peanut butter brownie swirl cookies for more PB inspiration.
What to Serve with Buckeye Bars
Pair these rich Buckeye Bars with a scoop of vanilla ice cream for an over-the-top sundae. Fresh berries or a light fruit salad cuts through the sweetness nicely. For beverages, go with cold milk, coffee, or even a chilled white wine. They’re also great alongside coffee cake cookies at brunch.

Buckeye Bars
Buckeye bars are a naturally gluten-free no-bake dessert made with the classic combination of a peanut butter and chocolate layered and sliced into perfect handheld dessert bars!
Timing
Recipe Details
Ingredients
- 01 1 cup creamy peanut butter
- 02 1 stick butter (softened)
- 03 1 teaspoon vanilla extract
- 04 2 ½ cups powdered sugar (do not pack)
- 05 2 cups chocolate chips
- 06 2 tablespoons coconut oil (optional)
Instructions
Line a square 9x9 baking dish with parchment paper.
Add the peanut butter and softened butter to the bowl of a stand mixer and beat on medium speed with a paddle attachment until combined thoroughly, scraping down the sides as it blends.
Add the vanilla extract and blend on low speed and then add the powdered sugar slowly. (careful not to over pack the measuring cup. see notes)
Once all powdered sugar is added, continue to mix on low speed until a ball forms. The dough should not be too wet. If it is add a little more powdered sugar.
Transfer the peanut butter mixture to the lined pan and press it down with fingers or he back of wooden spoon (press into the corners well)
In a separate microwave safe bowl, add the chocolate chips and coconut oil and microwave for 30 seconds then stir and heat for 20-30 more seconds.
Pour the melted chocolate mixture over the peanut butter layer and use a spatula to spread the chocolate evenly over top.
Place the bars in the refrigerator for approximately 2 hours to allow the chocolate to fully hardened.
Top with sea salt, if desired.
FILED UNDER:
NUTRITION FACTS (PER SERVING)
Nutrition information is calculated using an ingredient database and should be considered an estimate. In cases where multiple ingredient alternatives are given, the first listed is calculated for nutrition. Garnishes and optional ingredients are not included.
Frequently Asked Questions About Buckeye Bars
Can I make Buckeye Bars ahead of time?
Absolutely, Buckeye Bars are ideal for prepping in advance. Make them up to two days ahead and store in the fridge; the flavors even meld better. Just let them sit out briefly before serving to soften slightly.
How long does Buckeye Bars last in the fridge?
Your Buckeye Bars will stay fresh in the fridge for about a week in an airtight container. The chocolate might bloom if too cold, but it doesn’t affect taste. For best results, consume within five days.
Are Buckeye Bars gluten-free?
They can be! Use gluten-free graham crackers, and the rest of the ingredients are naturally GF. It’s a simple swap that keeps the texture intact.
Can I use milk chocolate for Buckeye Bars?
Yes, milk chocolate works wonderfully in Buckeye Bars for a sweeter profile. It melts just as easily, though semi-sweet balances the peanut butter better. Experiment to find your favorite – I love the variety!
Why are they called Buckeye Bars?
The name comes from Ohio’s state tree, the buckeye, due to their resemblance to the nut’s appearance. Peanut butter balls dipped in chocolate mimic the look, and bars make it easier to share. Fun history behind a tasty treat!
How do I prevent the chocolate from cracking on Buckeye Bars?
Let the peanut butter base chill fully before adding chocolate to your Buckeye Bars. Pour the melted chocolate slowly and evenly. If cracks form, it’s still delicious – no one will mind!
Can I add nuts to Buckeye Bars?
Definitely; stir in chopped peanuts or pecans to the base for crunch. It enhances the nutty vibe without overpowering. For more ideas, see our gluten-free chocolate chip cookies.
Are Buckeye Bars freezer-friendly?
Yes, freeze Buckeye Bars in single layers separated by parchment for up to three months. Thaw in the fridge overnight for perfect texture. They’re a great make-ahead for holidays!
Final Thoughts
There you have it – a foolproof recipe for Buckeye Bars that’ll become your new favorite dessert. From the easy prep to the decadent payoff, they’re everything a sweet treat should be. I encourage you to give them a try this weekend; you won’t regret it. Share your results or tag us – happy baking!