Crispy Chicken Caesar Sandwich

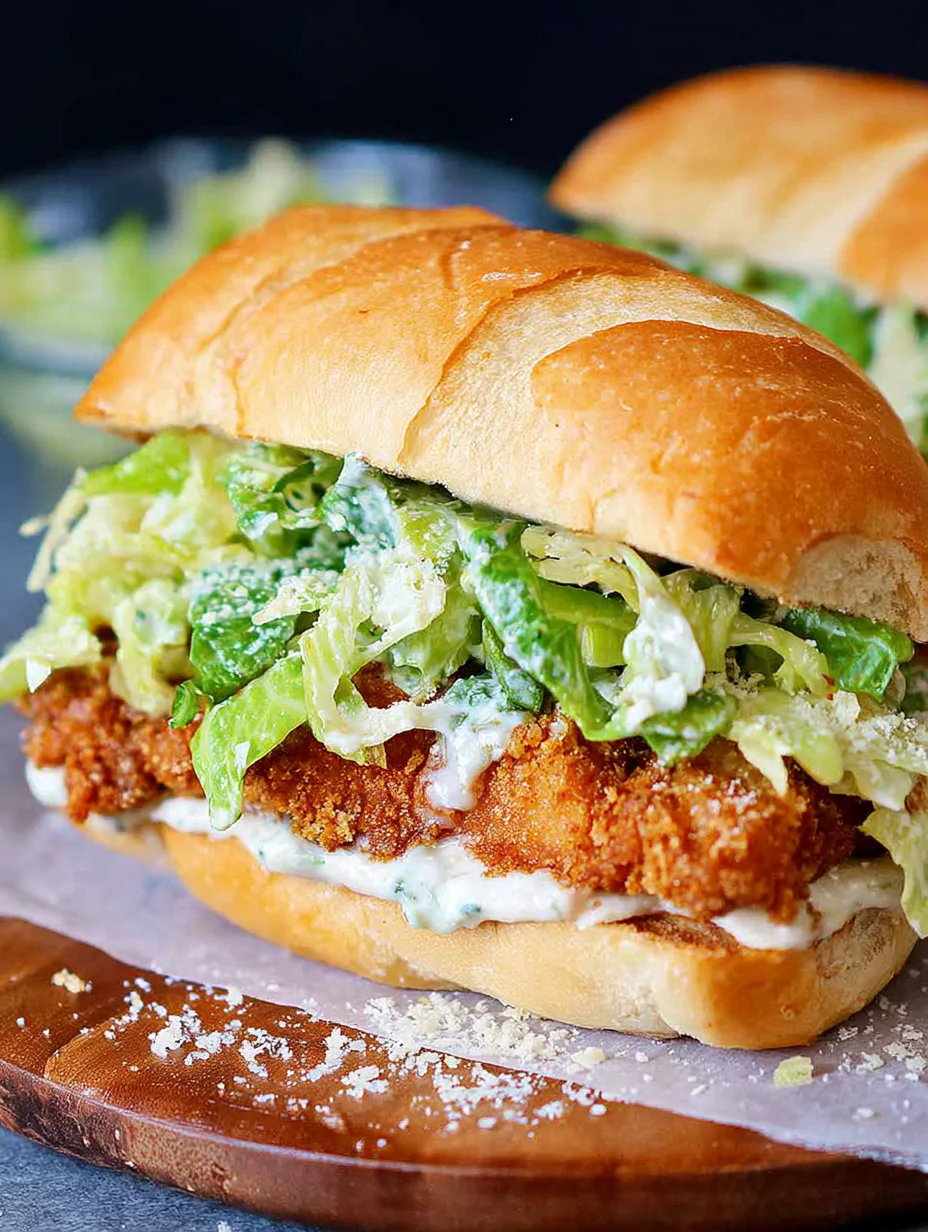
I’ve always been a sucker for a good sandwich that combines crunch and creaminess in one bite, and let me tell you, the Crispy Chicken Caesar Sandwich has become my go-to lunch obsession. Picture this: juicy chicken fried to golden perfection, nestled between toasted buns with crisp romaine, tangy Caesar dressing, and shavings of Parmesan—it’s like the classic Caesar salad decided to get cozy on bread. In my experience, whipping up this Crispy Chicken Caesar Sandwich at home is way better than any drive-thru version, and it’s surprisingly simple to make. If you’re craving something satisfying yet light, this recipe will hit the spot.
What I love most is how versatile it is for busy days; I often pair it with a quick side like our 15-minute strawberry spinach salad for a fresh contrast. Now, you might be thinking, “Does frying chicken take forever?” Not with my tips—it comes together in under 30 minutes. Let’s be honest, once you try this homemade Crispy Chicken Caesar Sandwich, you’ll wonder why you ever settled for less. I’m excited to share the steps so you can enjoy it too!
Key Takeaways:
- The Crispy Chicken Caesar Sandwich delivers restaurant-quality crunch at home with simple pantry staples.
- Ready in just 25-30 minutes, perfect for weeknight dinners or meal prep.
- Bursting with zesty Caesar flavors balanced by crispy, tender chicken.
- Use fresh lettuce and chill dressing for maximum freshness in your Crispy Chicken Caesar Sandwich.
- Store leftovers in the fridge for up to 2 days; reheat chicken gently to keep it crisp.
Why You’ll Adore This Crispy Chicken Caesar Sandwich
Irresistible Crunch Meets Creamy Bliss: There’s something magical about that first bite where the crispy coating shatters against the smooth Caesar dressing—it’s pure harmony. In my experience, this contrast elevates the entire Crispy Chicken Caesar Sandwich from good to unforgettable. You’ll find yourself craving it again and again.
Grab This Chef Knife Now - Almost Gone!

- Stays Razor-Sharp: Ice-hardened blade keeps its edge longer than ordinary knives
- Superior Grip Control: Unique finger hole design gives you perfect balance and safety
- Built to Last a Lifetime: Premium stainless steel blade with elegant beech wood handle
- ✓ Finally, a knife that stays sharp and feels comfortable in my hand
- ✓ Professional quality without the premium price tag
- ✓ Makes meal prep faster and more enjoyable
⏰ Only a few items left in stock - order soon
Quick and Effortless Preparation: Who has time for complicated meals? This recipe uses basic ingredients you likely have on hand, coming together faster than ordering takeout. I love how it saves the day on hectic evenings, leaving more time for what matters.
Customizable for Every Palate: Whether you add bacon for smokiness or swap in gluten-free buns, the Crispy Chicken Caesar Sandwich adapts beautifully. It’s hearty enough for lunch but light for dinner—truly a crowd-pleaser. What I find interesting is how a few tweaks can make it feel brand new each time.
Healthier Than You Think: Packed with lean protein and fresh veggies, it’s a smarter indulgence without sacrificing flavor. Here’s the thing: baking the chicken instead of frying keeps it just as delicious but lighter. You’ll feel great after enjoying every bite of this Crispy Chicken Caesar Sandwich.

Essential Ingredients for Crispy Chicken Caesar Sandwich
Chicken Breasts: Opt for boneless, skinless chicken breasts—about 1 pound total for four servings—as they provide the tender, juicy base that soaks up all the flavors. Slicing them thin ensures even cooking and that perfect crisp exterior without drying out. In this Crispy Chicken Caesar Sandwich, the chicken is the star, offering protein that keeps you full and satisfied long after lunch.
Grab This Kitchen Scale Now — Best Precision Pick!

- Razor-Accurate Every Time: Dual-increment precision down to 0.1g — perfect for baking, meal prep, and portion control with g, oz, ml, and fl'oz modes.
- Smart Removable Bowl Design: Detachable bowl doubles as a protective case for compact storage. Tare function lets you weigh ingredients in any container with zero fuss.
- Built for Everyday Convenience: Auto-zero, tare function, low battery alert, overload indicator, and 2-minute auto-off to extend battery life — all in a sleek stainless steel build.
- ✓ "Perfect for baking — precise, lightweight, and stores easily without wasting counter space"
- ✓ "A game changer! Weighing ingredients is now way more accurate than measuring cups"
- ✓ "Love the 0.1g precision and backlight — best food scale I've owned. Highly recommend!"
⏰ Only a few items left in stock - order soon
Panko Breadcrumbs: These Japanese-style crumbs are lighter and flakier than regular ones, creating an unbeatable crunch when fried. Mixed with Parmesan for extra zest, they coat the chicken evenly for a golden finish. I’ve tried various breadings, but panko always delivers the most satisfying texture in my Crispy Chicken Caesar Sandwich.
Caesar Dressing: A creamy blend of mayo, anchovies, garlic, and lemon—homemade or store-bought—ties everything together with its tangy punch. It drizzles over the lettuce and chicken, adding richness without overpowering. For the best Crispy Chicken Caesar Sandwich, choose one with bold flavors to complement the crisp elements perfectly.
How to Make Crispy Chicken Caesar Sandwich
Prepare the Chicken Coating
Start by pounding your chicken breasts to an even 1/2-inch thickness—this helps them cook quickly and stay juicy inside while getting that enviable crisp outside. Set up three shallow bowls: one with flour seasoned with salt and pepper, one with beaten eggs, and the last with panko mixed with grated Parmesan and a dash of garlic powder. Dredge each piece through flour, egg, then breadcrumbs, pressing gently to adhere; in my experience, this double-coating method makes your Crispy Chicken Caesar Sandwich extra crunchy and flavorful.
Fry to Golden Perfection
Heat about 1/2 inch of vegetable oil in a large skillet over medium-high heat until shimmering—test with a breadcrumb; it should sizzle immediately. Fry the breaded chicken for 4-5 minutes per side, turning once, until deep golden and cooked through to 165°F internally. The aroma alone will have you eager; let them drain on paper towels to stay crisp, adding that sensory delight of hot, crunchy chicken ready for assembly in your sandwich.
Assemble and Serve
While the chicken rests, toast your buns lightly for added texture, then slather the bottoms with Caesar dressing. Layer on crisp romaine leaves, shaved Parmesan, and if desired, a few croutons for extra crunch before topping with the hot chicken and bun lid. This step brings it all together into a cohesive, delicious Crispy Chicken Caesar Sandwich—serve immediately for the best experience. For a twist, check out our crispy chicken Caesar salad for non-sandwich inspo.
Ingredients
- 4 boneless, skinless chicken breasts (about 1 lb)
- 1 cup all-purpose flour
- 2 large eggs, beaten
- 1 ½ cups panko breadcrumbs
- ½ cup grated Parmesan cheese, plus more for shaving
- 1 tsp garlic powder
- Salt and black pepper, to taste
- Vegetable oil, for frying
- 4 ciabatta or hoagie buns
- ½ cup Caesar dressing
- 4 cups romaine lettuce, chopped
- 1 cup croutons (optional)
- Lemon wedges, for serving
Crispy Chicken Caesar Sandwich Instructions
- Pound chicken breasts to ½-inch thickness; season with salt and pepper.
- Dredge chicken in flour, then egg, then panko-Parmesan mixture.
- Heat oil in skillet to 350°F; fry chicken 4-5 minutes per side until golden and 165°F.
- Drain on paper towels; toast buns meanwhile.
- Spread dressing on buns, layer lettuce, Parmesan, chicken, and croutons if using.
- Serve with lemon wedges. Enjoy your Crispy Chicken Caesar Sandwich!
Pro Tips for the Best Crispy Chicken Caesar Sandwich
Chill the Dressing: Keep your Caesar dressing cold until assembly—it clings better to the warm chicken and keeps the lettuce crisp.
Double Dredge for Extra Crunch: Dip the chicken back in egg and breadcrumbs after the first coat for an even crispier Crispy Chicken Caesar Sandwich.
Use Fresh Lemon: Squeeze fresh lemon over the assembled sandwich just before eating to brighten the flavors without sogginess.
You Must Know
- The Crispy Chicken Caesar Sandwich is best enjoyed fresh to maintain the breading’s texture.
- Caesar dressing traditionally includes anchovies for umami—omit for a milder version.
- Aim for oil at 350°F to prevent greasy chicken in your sandwich.
- This recipe serves 4 and totals around 550 calories per sandwich.
How to Store Crispy Chicken Caesar Sandwich
To keep your Crispy Chicken Caesar Sandwich tasting great, store assembled ones in an airtight container in the fridge for up to 2 days—the breading softens slightly but reheats well. For longer freshness, wrap the chicken separately from the dressed lettuce and buns, then assemble when ready. Reheat the chicken in a 350°F oven for 5-7 minutes to revive crispiness without microwaving, which can make it soggy.
Customizing Your Crispy Chicken Caesar Sandwich
Feel free to swap the chicken for shrimp or tofu for a seafood or vegetarian twist on the Crispy Chicken Caesar Sandwich— the breading works wonders either way. Add sliced tomatoes, avocado, or bacon bits for extra flair, or use a whole wheat bun for more fiber. If you’re watching calories, bake the chicken at 400°F for 20 minutes instead of frying. For inspiration on variations, try our chicken Caesar wraps recipe.
What to Serve with Crispy Chicken Caesar Sandwich
Pair your Crispy Chicken Caesar Sandwich with a refreshing side like a cucumber carrot salad to balance the richness with cool crunch. For heartier meals, go with oven-baked fries or sweet potato wedges. Don’t forget a crisp white wine or iced tea to wash it down—simple sides let the sandwich shine.

Crispy Chicken Caesar Sandwich
This Chicken Caesar Sandwich features crispy breaded chicken, creamy Caesar dressing, and fresh romaine on a crusty baguette for a mouthwatering, satisfying meal. Perfect for lunch or dinner!
Timing
Recipe Details
Ingredients
- 01 ½ cup full-fat mayonnaise
- 02 3 tbsp Greek yogurt
- 03 1 tsp Dijon mustard
- 04 1 tsp Worcestershire sauce
- 05 2 tbsp lemon juice
- 06 ¼ cup Parmesan cheese (freshly grated)
- 07 1-2 garlic cloves (minced)
- 08 ¼ tsp black pepper
- 09 Pinch sea salt
- 10 5 chicken cutlets (see note 1)
- 11 sea salt (to taste)
- 12 ground black pepper (to taste)
- 13 Oil (for frying)
- 14 ⅓ cup all-purpose flour
- 15 ½ tsp salt
- 16 ¾ tsp smoked paprika
- 17 2 eggs
- 18 ¼ tsp salt
- 19 ¾ cup panko crumbs
- 20 ¼ cup breadcrumbs
- 21 1 tsp dried parsley
- 22 ½ tsp ground black pepper
- 23 ½ tsp sea salt
- 24 ½ tsp dried oregano
- 25 1 tsp garlic powder
- 26 ¼ cup Parmesan cheese (freshly grated)
- 27 2 romaine hearts (chopped)
- 28 1-2 French baguettes
- 29 Parmesan cheese (freshly grated)
Instructions
In a bowl, prepare the Caesar dressing by mixing all ingredients. Stir until smooth and creamy. Take 4–5 tablespoons of this dressing and mix it with the chopped romaine lettuce in a medium bowl. Cover both the salad and the remaining dressing and refrigerate both components separately for later.
Lay the chicken cutlets on a cutting board. If they are uneven in thickness, gently pound them with a meat mallet or rolling pin to make them even. Sprinkle both sides with salt and ground black pepper.
Set up the breading station with three shallow plates. In the first, mix the flour, salt, and smoked paprika. In the second, whisk the eggs with salt until well combined. In the third, panko, breadcrumbs, dried parsley, black pepper, salt, dried oregano, garlic powder, and grated Parmesan cheese.
Heat oil in a frying pan over medium heat. Take one chicken cutlet and dredge it in the flour mixture, shake off any excess. Next, dip it into the eggs mixture. Finally, firmly press it into the breadcrumb mix. Repeat for all cutlets.
Once the oil is hot (test by dropping in a few breadcrumbs—if they sizzle, it's ready), carefully place the chicken into the pan. Fry until golden brown on one side, then flip and cook the other side until crispy and fully cooked. This should take about 4-5 minutes per side, depending on thickness. Remove and place on a wire rack to drain excess oil. Fry in batches so not to overcrowd.
Slice the baguettes into 12 cm (5") portions and cut each one open lengthwise. Spread a layer of the reserved Caesar dressing , place a crispy chicken cutlet on top, followed by a generous amount of the Caesar salad. Sprinkle with extra grated Parmesan. Close the sandwiches and serve immediately with fries.
FILED UNDER:
NUTRITION FACTS (PER SERVING)
Nutrition information is calculated using an ingredient database and should be considered an estimate. In cases where multiple ingredient alternatives are given, the first listed is calculated for nutrition. Garnishes and optional ingredients are not included.
Frequently Asked Questions About Crispy Chicken Caesar Sandwich
Can I make Crispy Chicken Caesar Sandwich ahead of time?
Yes, you can bread and fry the chicken up to a day in advance, storing it in the fridge uncovered to preserve crispiness. Assemble just before eating to avoid soggy buns from the dressing. It’s a great meal-prep option for lunches.
How long does Crispy Chicken Caesar Sandwich last in the fridge?
Assembled, it keeps for 1-2 days in an airtight container, but the lettuce may wilt slightly. Undressed components last up to 3 days. Reheat chicken gently to maintain texture.
Is the Crispy Chicken Caesar Sandwich gluten-free?
Not as written, due to the flour and breadcrumbs, but you can easily swap in gluten-free versions for both. Use GF buns too for a fully safe meal—I’ve done this for friends with great results.
Can I bake the chicken for the Crispy Chicken Caesar Sandwich?
Absolutely, baking at 425°F for 20-25 minutes on a wire rack gives a healthier crisp without oil. Spray with cooking spray for golden color. Your Crispy Chicken Caesar Sandwich will still be delicious and lighter.
What if I don’t have panko for my Crispy Chicken Caesar Sandwich?
Regular breadcrumbs or crushed cornflakes work fine as substitutes, though panko gives the best lightness. Season them well to keep the flavor punchy.
How spicy can I make the Crispy Chicken Caesar Sandwich?
Add cayenne to the breading or hot sauce to the dressing for heat—start with ½ tsp and adjust. The creaminess balances spice nicely in this Crispy Chicken Caesar Sandwich.
Is this Crispy Chicken Caesar Sandwich kid-friendly?
Yes, kids love the crunchy chicken; just tone down anchovies in the dressing if using homemade. Cut into smaller pieces for little hands.
Can I air-fry the chicken in the Crispy Chicken Caesar Sandwich recipe?
Sure, air-fry at 400°F for 8-10 minutes, flipping halfway—lightly spray for crisp. It’s a quick, low-oil alternative that keeps the Crispy Chicken Caesar Sandwich tasting fried. For more ideas, see our chicken Caesar pasta salad.
Final Thoughts
There’s nothing quite like sinking your teeth into a well-made Crispy Chicken Caesar Sandwich—it’s comfort food with a fresh twist that never gets old. From the crispy bite to the creamy dressing, every element works in harmony to create something special. I encourage you to give this recipe a try this weekend; share your twists in the comments! Your taste buds will thank you.